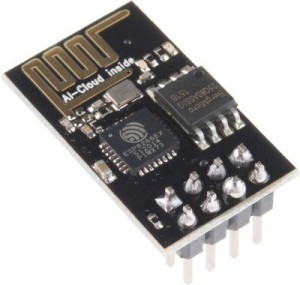
This article is about the one that looks like this (aka ESP-01).
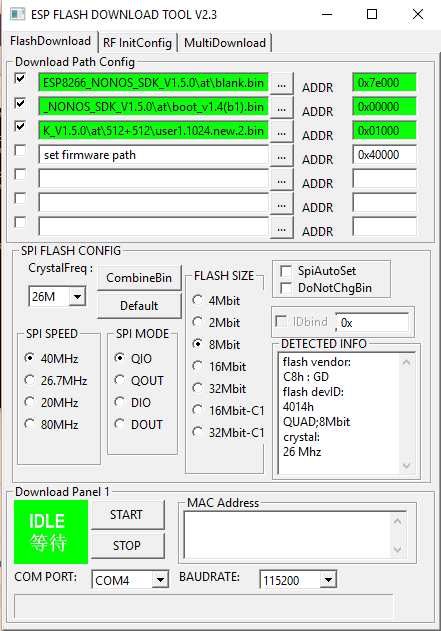
Flasher version is 2.3
Firmware version is 1.5
Firmware update might be necessary just after purchase. Without firmware update mine was not able to connect to Wi-fi routers (though they were able to find them)
The current firmware available for this is “ESP8266_AT_v0.51”. The direct link to the download http://bbs.espressif.com/viewtopic.php?f=46&t=1451 . The download is at the bottom of the page as an Attachment.
The flasher (for flashing firmware) can be found here http://bbs.espressif.com/viewtopic.php?f=57&t=433. The .rar version contains the necessary files to update the firmware.
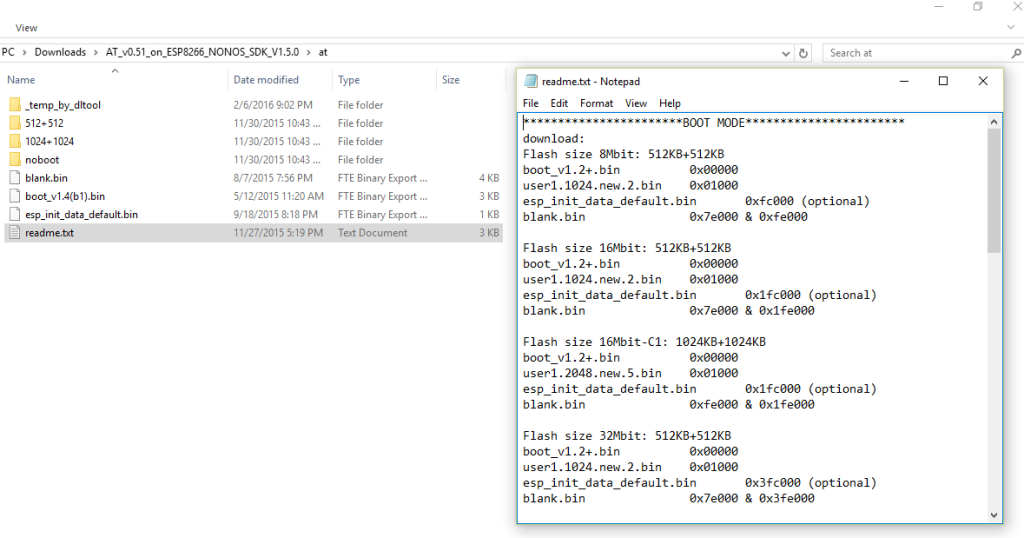
WARNING: read the readme file that came with the firmware.
Please note New chips need DOUT specifically, whereas old ones work with both QIO and DOUT
Latest Flasher and Firmware Downloads (6th Feb, 2016):
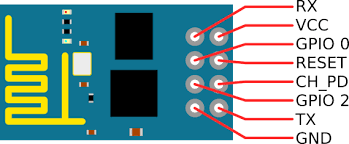
Pin configuration of the module
IMPORTANT NOTES:
- This board runs on 3.3v
- The default Baud rate is 115200
- Boot errors are output over 74800. This is default and fixed.
- For the RX TX line voltage divider using resistors doesn’t work. Using a 150 ohms in series for now, waiting for my Logic Level converter. But then so far (many years now) direct connection didn’t damage the ESP-01.
Flashing
- Used an Arduino Uno to flash the firmware.
- Upload a blank sketch to the Arduino.
- The module’s RX will go to Arduino RX and similarly TX will go TX.
- GPIO_0 will go to GND
- VCC and CH_PD will go to the 3.3v supply line
- Load the flasher
- Mine one came with “Ai-Cloud insid8” written. This module has a Flash size of 8Mbit: 512KB+512KB. QuadIO and 26MHZ crystal.
- Select the appropriate files in the “Download Path Config” section in the flasher tool. Some of the addresses might also need to be adjusted. READ the readme file that came with the firmware.
- Select the COM port on which Arduino is connected and the set the Baud rate to 115200 (the default of this board)
- Press start. If all goes well it will show finish to the left of the “Start” and “Stop” button
- If it fails – press “Stop”. Reset the board by Grounding RESET pin. And press Start again
- If the flashing is going on properly then the TX light of Arduino and the Blue light of the module will flash.
- Once firmware has been flashed disconnect the GPIO_0 pin from GND. Reset the module and start working
Useful links:
http://www.electrodragon.com/w/Category:ESP8266_Firmware_and_SDK
AT Commands
- Used Arduino Serial monitor for sending AT commands to the Module.
- The RX and TX pin configuration will remain same as above.
- Start with the AT command.
- List of some useful AT commands : http://www.pridopia.co.uk/pi-doc/ESP8266ATCommandsSet.pdf
Notes
- After flashing the default baud rate becomes 115200. And also the CWMODE might need to be changed to 1 or 3 manually (mine somehow went to mode 2 that is AP mode)
- If the RTOS firmware is flashed then the “user1.1024.new.2.bin” file inside the AT directory cannot be flashed – it makes the chip non-responsive.
- The required files for RTOS firmware comes in the zip file named “AT_V0.60_on_ESP8266_NONOS_SDK_V1.5.2_20160203” and is inside “noboot” folder.
Updated version of this here: https://www.kolkataonweb.com/code-bank/arduino/esp-01-burning-at-rom-new-and-updated/


