Mainly three things are needed
- A file named firebase-messaging-sw.js placed in the root of the website. This file contains the codes for receiving the push when the browser is minimized or that particular website is closed.
- The scripts for receiving the push
- The server side code to send the PUSH
firebase-messaging-sw.js
//Base library
importScripts("https://www.gstatic.com/firebasejs/7.21.1/firebase-app.js");
//needed for PUSH Message
importScripts("https://www.gstatic.com/firebasejs/7.21.1/firebase-messaging.js");
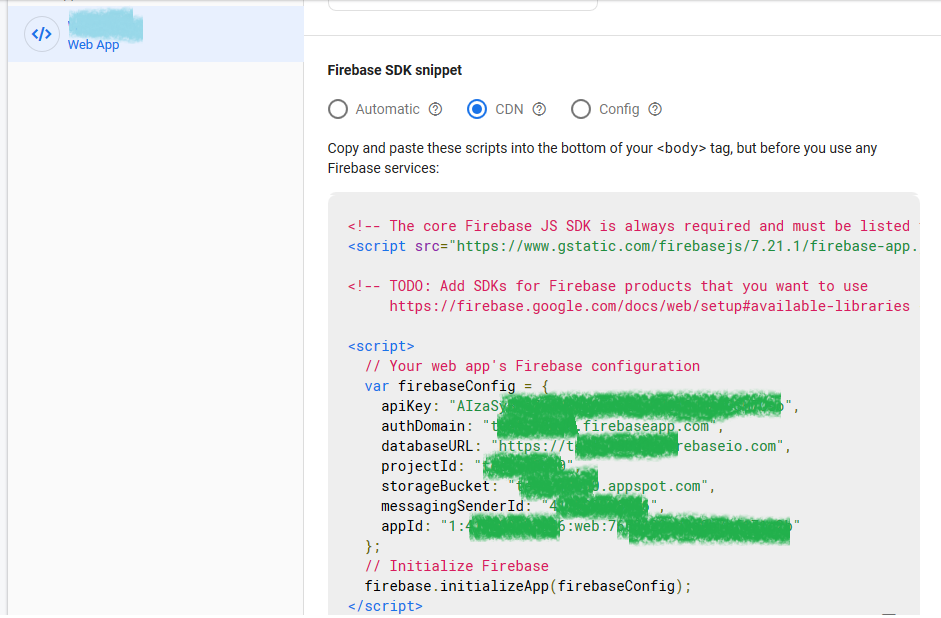
// Your web app's Firebase configuration
//All these details is available from Firebase Console. The readymade configuration code is available also - please see the attached screenshot
var firebaseConfig = {
apiKey: "xxxxxxxxxxxxxxxxxxx_x-xxxxxxxxxxxx",
authDomain: "app-name-123456.firebaseapp.com",
databaseURL: "https://app-name-123456.firebaseio.com",
projectId: "app-name-123456",
storageBucket: "app-name-123456.appspot.com",
messagingSenderId: "123456789012",
appId: "1:123456789012:web:xxxxxxxxxxxxxxxxxx",
measurementId: "G-xxxxxxxxxxxx"
};
// Initialize Firebase
firebase.initializeApp(firebaseConfig);
const messaging = firebase.messaging();
// If you would like to customize notifications that are received in the
// background (Web app is closed or not in browser focus) then you should
// implement this optional method.
// [START background_handler]
messaging.onBackgroundMessage(function(payload) {
console.log('[firebase-messaging-sw.js] Received background message ', payload);
// Customize notification here
const notificationTitle = payload.notification.title;
const notificationOptions = {
body: payload.notification.body,
icon: 'https://mywebsite.com/icon.png',
image: 'https://mywebsite.com/logo.png'
};
return self.registration.showNotification(notificationTitle,
notificationOptions);
});
// [END background_handler]Code for Receiving the Push and processing and displaying the PUSH when the page is open
At present some browsers need user interaction (request raised from an user event handler) to show the access permission popup. The best way to do is to check for permission status (granted or not) and show a Custom popup if not granted. In the custom popup put two buttons – Accept/Yes and Decline/No. On pressing Accept/Yes call the requestPermission function.
When the page is fully loaded (document ready) we are calling the updateUIForPushPermissionRequired function. Inside it we are checking if permission already granted or not. If not granted then we are showing the custom popup
<!DOCTYPE html>
<html>
  <head>
    <meta charset="UTF-8">
  </head>
  <body>
    <div id="notificationPopUp" class="notificationPopup" style="display:none">
      <div class="notif-body">
        <button id="closeNotification" class="uk-modal-close-default uk-icon uk-close" type="button" uk-close="" onclick="dismissnotificationPopUp()">
          <svg width="14" height="14" viewBox="0 0 14 14" xmlns="http://www.w3.org/2000/svg" data-svg="close-icon">
            <line fill="none" stroke="#000" stroke-width="1.1" x1="1" y1="1" x2="13" y2="13">
            </line>
            <line fill="none" stroke="#000" stroke-width="1.1" x1="13" y1="1" x2="1" y2="13">
            </line>
          </svg>
        </button>
        <div class="notif-logo">
          <img src="https://api.wisck.com/logo-wisck.png" alt="" width="100%" height="150">
        </div>
        <div class="notif-content">
          <p class="notif-title">Allow Notifications?
          </p>
          <p class="text_pop_up">Get notifications of new contents and updates
          </p>
          <p class="text_pop_up">Notification option can be managed from browser settings.
          </p>
          <div class="notif-btns">
            <button id="blockNotification" class="button-decline" onclick="dismissnotificationPopUp()">No
            </button>
            <button id="allowNotification" class="button-accept" onclick="requestPermission()">Yes
            </button>
          </div>
        </div>
      </div>
    </div>

   <div id="snackbar"><p id="snackbarTitle">Title</p><p id="snackbarBody">Body</p></div>

    <!-- The core Firebase JS SDK is always required and must be listed first -->
    <script src="https://www.gstatic.com/firebasejs/8.6.8/firebase-app.js">
    </script>
    <script src="https://www.gstatic.com/firebasejs/8.6.8/firebase-messaging.js">
    </script>
    <!-- TODO: Add SDKs for Firebase products that you want to use https://firebase.google.com/docs/web/setup#available-libraries -->

<script>  // Your web app's Firebase configuration var
    firebaseConfig = {
        apiKey: "xxxxxxxxxxxxxxxxxxx_x-xxxxxxxxxxxx",
        authDomain: "app-name-123456.firebaseapp.com",
        databaseURL: "https://app-name-123456.firebaseio.com",
        projectId: "app-name-123456",
        storageBucket: "app-name-123456.appspot.com",
        messagingSenderId: "123456789012",
        appId: "1:123456789012:web:xxxxxxxxxxxxxxxxxx",
        measurementId: "G-xxxxxxxxxxxx"
    }; // Initialize Firebase
firebase.initializeApp(firebaseConfig);
firebase.analytics();
const messaging = firebase.messaging();
messaging.onMessage((payload) => {
    console.log('Message received. ', payload);
    var x = document.getElementById("snackbar");
    // Add the "show" class to DIV
    x.className = "show";
    $("#snackbarTitle").html(payload.notification.title);
    $("#snackbarBody").html(payload.notification.body);
    // After 3 seconds, remove the show class from DIV
    setTimeout(function() {
        x.className = x.className.replace("show", "");
    }, 3000);
    // Update the UI to include the received message.
});

function resetUI() {
    // Get registration token. Initially this makes a network call, once retrieved // subsequent calls to getToken will return from cache.
    messaging.getToken({
        vapidKey: 'xxxxxxxxxxxxx-xxxxxxxxxxxxxxxxxxxxxxxxxxxxxxxxxxxxxxxxxxxxx-xxxxx-xxxxxx-xxx'
    }).then((currentToken) => {
        if (currentToken) {
            sendTokenToServer(currentToken);
        } else {
            // Show permission request.
            console.log('No registration token available. Request permission to generate one.');
            // Show permission UI.
            updateUIForPushPermissionRequired();
            setTokenSentToServer(false);
        }
    }).catch((err) => {
        console.log('An error occurred while retrieving token. ', err);
        //showToken('Error retrieving registration token. ', err);
        setTokenSentToServer(false);
    });
}
// Send the registration token your application server, so that it can: // - send messages back to this app // - subscribe/unsubscribe the token from topics function
sendTokenToServer(currentToken) {
    if (!isTokenSentToServer()) {
        console.log('Sending token to server...');
        // TODO(developer): Send the current token to your server.
        $.ajax({
            url: base_url + 'update-token.php',
            type: 'post',
            data: {
                userId: userId,
                deviceToken: currentToken,
                deviceType: "web"
            },
            headers: {
                'Content-Type': 'application/x-www-form-urlencoded'
            },
            dataType: 'json',
            headers: {
                'Content-Type': 'application/x-www-form-urlencoded',
                'Access-Control-Allow-Origin': '*',
                "Access-Control-Allow-Headers": "Content-Type, Access-Control-Allow-Headers, Authorization, X-Requested-With"
            },
            success: function(response) {
                console.log('Token sent to server...');
            }
        });
        setTokenSentToServer(true);
    } else {
        console.log('Token already sent to server so won\'t send it again ' + 'unless it changes');
    }
}

function isTokenSentToServer() {
    return window.localStorage.getItem('sentToServer') === '1';
}

function setTokenSentToServer(sent) {
    window.localStorage.setItem('sentToServer', sent ? '1' : '0');
}

function requestPermission() {
    $('#notificationPopUp').hide();
    //hide the own permission popup - the browser will take over now
    console.log('Requesting permission...');
    Notification.requestPermission().then((permission) => {
        if (permission === 'granted') {
            console.log('Notification permission granted.');
            // TODO(developer): Retrieve a registration token for use with FCM.
            // In many cases once an app has been granted notification permission,
            // it should update its UI reflecting this.
            resetUI();
        } else {
            console.log('Unable to get permission to notify.');
        }
    });
}

function deleteToken() {
    // Delete registration token.
    messaging.getToken().then((currentToken) => {
        messaging.deleteToken(currentToken).then(() => {
            console.log('Token deleted.');
            setTokenSentToServer(false);
            // Once token is deleted update UI.
            resetUI();
        }).catch((err) => {
            console.log('Unable to delete token. ', err);
        });
    }).catch((err) => {
        console.log('Error retrieving registration token. ', err);
        showToken('Error retrieving registration token. ', err);
    });
}

function updateUIForPushPermissionRequired() {
    if (Notification.permission != "granted") //if permission not granted yet then show custom popup.
    {
        $('#notificationPopUp').slideDown("fast");
        //show the custom popup to ask permission.
    } else requestPermission();
}

function dismissnotificationPopUp() {
    $('#notificationPopUp').hide();
}
$(document).ready(function() {
        updateUIForPushPermissionRequired();
    })
</script>

  </body>
</html>
CSS for for the notification popup and the notifications
.notificationPopup {
position: fixed;
top: 0;
left: 50%;
transform: translateX(-50%);
background: #fff;
z-index: 9999;
box-shadow: 1px 2px 10px rgba(0,0,0,.5);
}

.notificationPopup .notif-body {
padding: 15px;
display: flex;
}

.notificationPopup .uk-modal-close-default {
position: absolute;
right: 10px;
top: 10px;
background: 0 0;
border: 0;
}

.notificationPopup .notif-logo {
max-width: 70px;
min-width: 70px;
padding-right: 10px;
}


.notificationPopup .notif-logo img{
margin-top: 50%;
}


.notificationPopup .notif-content .notif-title {
font-size: 18px;
font-weight: 600;
margin: 10px 0;
}

.notificationPopup .notif-content .text_pop_up {
font-size: 16px;
font-weight: 400;
margin: 0;
}

.notificationPopup .notif-btns {
text-align: right;
padding-top: 5px;
}

.notificationPopup .notif-btns .button-decline {
border: 1px solid #ddd;
color: #666;
}

.notificationPopup .notif-btns .button-accept {
border: 1px solid #ec2436;
background-color: #ec2436;
color: #fff;
font-weight: 600;
}

.notificationPopup .notif-btns button {
background: 0 0;
border: 0;
padding: 5px 15px;
cursor: pointer;
margin-left: 10px;
}

.notificationPopup .uk-modal-close-default {
position: absolute;
right: 10px;
top: 10px;
background: 0 0;
border: 0;
}

.uk-close {
color: #999;
transition: .1s ease-in-out;
transition-property: all;
transition-property: color,opacity;
}


/* The snackbar - position it at the bottom and in the middle of the screen */
#snackbar {
visibility: hidden; /* Hidden by default. Visible on click */
min-width: 250px; /* Set a default minimum width */
margin-left: -125px; /* Divide value of min-width by 2 */
background-color: #333; /* Black background color */
color: #fff; /* White text color */
text-align: center; /* Centered text */
border-radius: 2px; /* Rounded borders */
padding: 16px; /* Padding */
position: fixed; /* Sit on top of the screen */
z-index: 9999; /* Add a z-index if needed */
left: 10%; /* Center the snackbar */
bottom: 30px; /* 30px from the bottom */
}

#snackbar p{
color: #fff; /* White text color */
}

#snackbarTitle{
font-weight: bold; /* White text color */
}

/* Show the snackbar when clicking on a button (class added with JavaScript) */
#snackbar.show {
visibility: visible; /* Show the snackbar */
/* Add animation: Take 0.5 seconds to fade in and out the snackbar.
However, delay the fade out process for 2.5 seconds */
-webkit-animation: fadein 0.5s, fadeout 0.5s 2.5s;
animation: fadein 0.5s, fadeout 0.5s 2.5s;
}

/* Animations to fade the snackbar in and out */
@-webkit-keyframes fadein {
from {bottom: 0; opacity: 0;}
to {bottom: 30px; opacity: 1;}
}

@keyframes fadein {
from {bottom: 0; opacity: 0;}
to {bottom: 30px; opacity: 1;}
}

@-webkit-keyframes fadeout {
from {bottom: 30px; opacity: 1;}
to {bottom: 0; opacity: 0;}
}

@keyframes fadeout {
from {bottom: 30px; opacity: 1;}
to {bottom: 0; opacity: 0;}
}
Code for sending
<?php
define('SERVER_API_KEY', 'XXXXXXXX:XXXXXXXX-XXXXXX_XXXXXXXXXXXXXXXXXXXXXXXXXXXXXXXXXXXXXXXXXXXXXXXXXXXXXXXXXXXXXXXXXXXXXXXX-X-');

//FOR WEB ALSO TOKENS GET GENERATED.
$tokens = ['XXXXXXXXXXXXXXXX:XXXXXXXXXXXXXXXXXXXXXXXXXXXXXXXXXXXXXXXXXXXXXXXXXXXXXXXX-XXXXXXXX-XXXXXXXX-XXXXXXXX',
'XXXXXXXXXXXXXXXX:XXXXXXXXXXXXXXXXXXXXXXXXXXXXXXXXXXXXXXXXXXXXXXXXXXXXXXXX-XXXXXXXX-XXXXXXXX-XXXXXXXX'
];

$header = [
     'Authorization: Key= ' . SERVER_API_KEY,
     'content-Type: Application/json'
];

$notification = [
      'title' => 'Testing Notification',
      'body' => 'Testing Notification Body',
      'icon' => '',
	  'sound' => 'default',
	  'click_action' => "android.intent.action.MAIN"
];

$data = [
      'title' => 'Testing Notification',
      'body' => 'Testing Notification Body',
      'icon' => '',
	  'sound' => 'default',
];

$options = [
	'priority'=> 'high'
];

$payload = [
       'registration_ids' => $tokens,
	   'notification' => $notification,
	   'data' => $data,
	   'options' => $options
];

$curl = curl_init();

curl_setopt_array($curl, array(
  CURLOPT_URL => "https://fcm.googleapis.com/fcm/send",
  CURLOPT_RETURNTRANSFER => true,
  CURLOPT_CUSTOMREQUEST => "POST",
  CURLOPT_POSTFIELDS => json_encode( $payload ),
  CURLOPT_HTTPHEADER => $header,
));

$response = curl_exec($curl);
$err = curl_error($curl);

curl_close($curl);

if ($err) {
  echo "cURL Error #:" . $err;
} else {
  echo $response;
}
?>
Please note this code will show two popups in background mode – that is because Push is being sent as “Notification”. Browser is handling that and showing one on its own. And another from the backgroundHandler code in Service Worker file. For showing only the custom popup use “Data” instead of “Notification” in the Push body.
How to find list of all FCM parameters https://www.kolkataonweb.com/code-bank/miscellaneous/google-fcm-all-push-notification-parameters/
One comment