Humidity sensor

There are many Humidity sensors available. DHT-11/DHT-20/DHT-22 from Aosong are the cheapest and easily available in India.

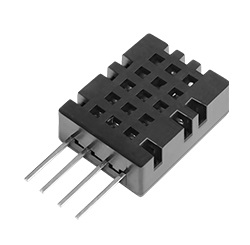
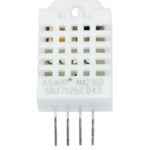
DHT-11 is the cheapest. DHT-22 or AM2302 is a good choice for hobby purposes or college projects. DHT20 has replaced DHT22 but still DHT22 is still the most available one.

DHT20 is colored black and DHT22 is white.

DHt-20 DHT-22

There are many manufacturers, even nameless ones.  But sensor from Aosong is the preferred.

The module needs a pullup resistor. 10K will do. They can be put at a distance from the controller. The length of the cable depends on the voltage. With 5v it can be upto 3mts and for 3.3v the max is 1 meter.

Best library in my opinion is the one from Adafruit, which is available here.

The library can be downloaded from here also DHT-sensor-library by Adafruit

Some other Humidity sensors are SHT20D, HTU21D-F, BME280. The HTU21D-F has protective cover or membrane on the sensor. SHT2x or SHT3x also has protective caps available.

ESP-01 Serial.println() or Serial.print() not working

I went crazy, mad trying to understand why the module is not printing anything to the Serial Monitor or receiving any AT commands.

I went through lots of articles on the internet and was on the verge of throwing the module away. Just that my mind was not willing to believe that it is dead – because I was able to burn OS / Firmware to the module every time I tried and the status showed success. And my suspicion was confirmed accidentally – I put some Serial.print code in loop instead of setup and it did throw output to serial monitor. It confirmed that something is wrong with the settings of Arduino IDE.

After lots of tweaking and trials I found that – the “Built In Led” settings of Arduino that mattered.  The built in LED is on the TX line of the module, hence just after printing some output when I toggled the LED, the print function didn’t get enough time to write to the monitor. To solve the matter a delay can be used also.

void setup() {
  // put your setup code here, to run once:
  Serial.begin(115200);
  Serial.println("");
  Serial.println("Hello");
  delay(1000);
  pinMode(1, OUTPUT);
}

void loop() {
  // put your main code here, to run repeatedly:
  digitalWrite(1, LOW); // turn the LED on (HIGH is the voltage     level)
  delay(500); // wait for a second
  digitalWrite(1, HIGH); // turn the LED off by making the voltage LOW
  delay(300); 
  digitalWrite(1, LOW); 
  delay(500); // wait for a second
  digitalWrite(1, HIGH); 
  delay(2000); 
}

In my module the LED is on PIN 1.

ESP-01 and ESP-01S Burning AT ROM- New and Updated

Few years back I had posted an article on burning ROM on ESP-01. The method worked good on my older boards but not working on the newer chips.

I needed to spend quite some hours to figure out the problem. And then it turned out that it is the SPI mode that is the matter. Also the new Flash tool (v 3.9.2 ) is not robust. It often becomes unresponsive.

  • Upload a blank sketch to Arduino Uno
  • The new ones need DOUT, 26 Mhz Xtal (check the board), SPI Speed 40 Mhz, 8Mbit. Burning with other modes may result in success but the chip will not work and will end up with boot errors. I got reset reason: 2, boot(3,7)
  • Connect RX to RX and TX to TX
  • GPIO_0 will go to GND
  • VCC and CH_PD will go to the 3.3v supply line
  • Select the appropriate ESP8266 board from Tools > Board menu.
  • Select the appropriate Flash mode (Only DOUT works for new chips. Old chips work with both QIO and DOUT)
  • Select baudrate as 115200
  • Start upload
  • RESET the module. This is a critical step and the timing matters. It may need a few tries to get it perfect.

The new Flash tool (v 3.9.2 ) is not robust. It often becomes unresponsive. The quick fix solution I found is pressing enter in the console (black window that it opens) and then disconnecting and reconnecting the Arduino (USB cable).

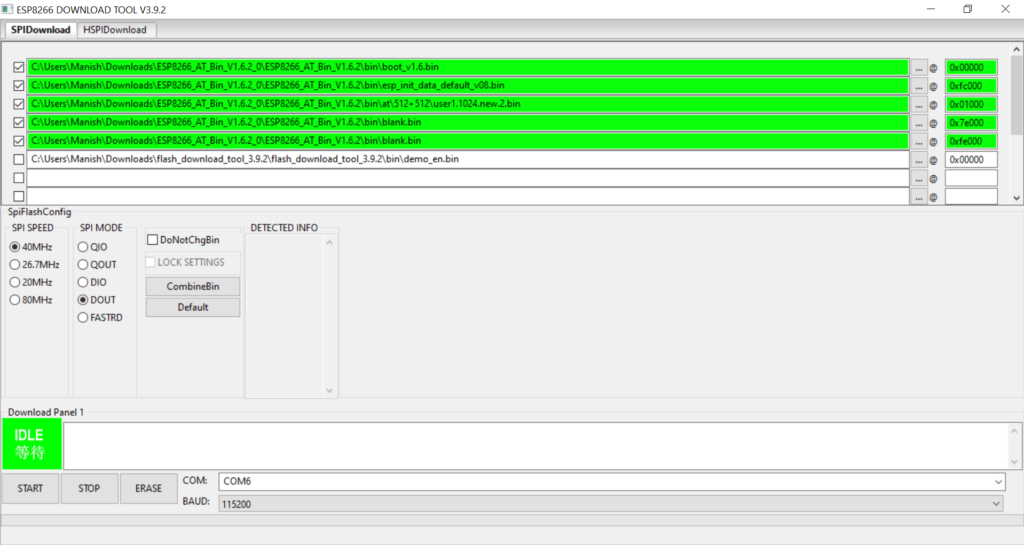
Wrong flashing may cause boot problems. To correct ERASE and FLASH OR FLASH all memory locations like shown below

The appropriate addresses can be found in the folder \ESP8266_AT_Bin_V1.6\bin\at\README.md

Please note – DoNotChgBin is unchecked.

After flashing Firmware version 1.6

AT+GMR
AT version:1.6.0.0(Feb 3 2018 12:00:06)
SDK version:2.2.0(f28eaf2)
compile time:Feb 6 2018 14:36:23
Bin version(Wroom 02):1.6.0
OK

All diagnostic messages  are sent at 74880 Bauds.
But AT commands are available only at 115200 Bauds.

After flashing disconnect GPIO_0 from GND and RESET

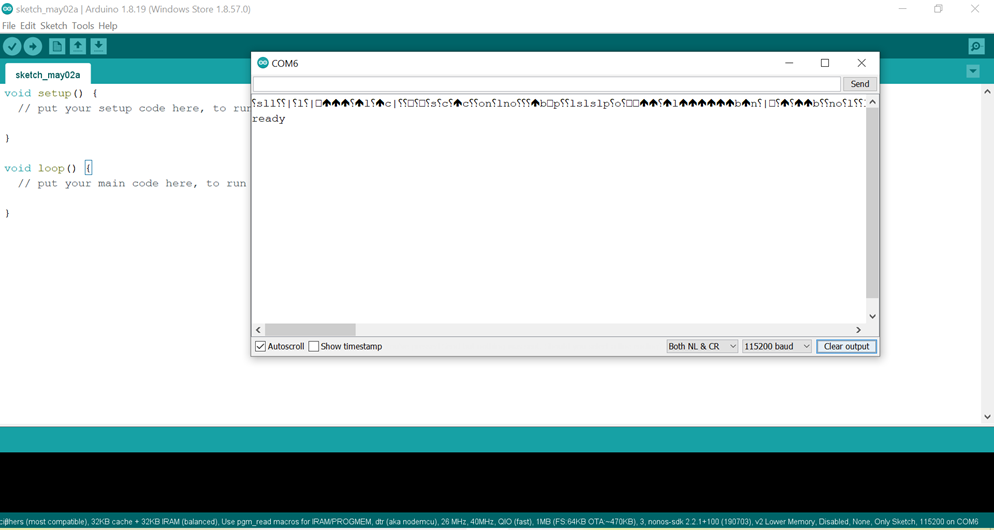
On proper flashing it will show ready like below


Here is the latest flash tool
Here is the ROM Version 1.6
Here is the ROM Version 1.6.2

NOTES:

  • Adequate power supply is needed for burning. I am using a buck convertor capable of delivering upto 1 amp.
  • Burning new chips with QIO will result in a successful burning but the code will not run.


DIY Solar Installation – Part 2 – Calculating Capacity

The capacity of the system depends on the load or electrical devices that will be run. Below is guide to help calculating the panel’s wattage and battery capacity.

First thing to decide if you want to go for offline or online system. In offline system the load is totally run by solar power and only solar power. In online system grid power (or electricity supply) is used if needed.

Setting up an offline system will be costly as it will need to generate enough power to run the load and charge batteries enough to run the load throughout the night. And if cloudy days are to be considered then it will be even more. It may not be cost effective to setup an offline system that will power in rainy seasons. It will be better to keep some fossil fuel based generators.

With online systems power can be supplemented by the grid if needed, say during rainy season. Also if the power supply company has provisions, then excess power generated can be sent back to grid and thus reducing the electricity charges.

There are some considerations to be made

  1. The max power of the panels are generated only a few hours a day.
  2. Normally I assume 5 hours of sun (effective sun) as beyond those hours sun is not very strong. Even for those 5 hours the sun doesn’t shine full or straight on the panels.
  3. The panels performs best if they are arranged facing south.
  4. The inclination should be equal to the latitude of the place.
  5. There will be cloudy days.
  6. Winter has less sun power and may have fog and mist.
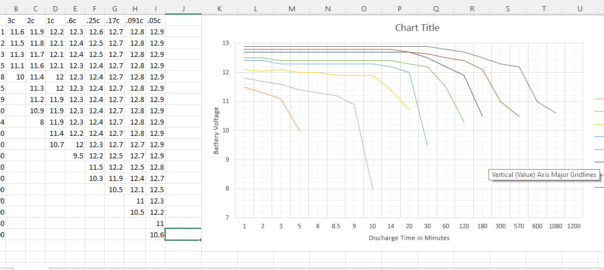
  7. Battery backup time depends on the battery capacity and current drawn. You can view this article (Exide Battery EP Plus Series (AGM VRLA) Discharge Pattern) to understand the discharge patterns of Lead acid batteries. Though the pattern varies from battery type (sealed, gel, flooded) and manufacturers but this will give an idea on the battery current drawn and backup time.

Now how to calculate the panel and battery size. Below I am showing calculations for offline system. And to keep it simple I am assuming same load throughout the day.

Suppose I want to run a 100 watt load for 24 hours on solar power.  Like mentioned in point 2 above, full sun or effective sun is available for 5 hours only in a day. During this 5 hours the panels will have to run the system and charge the batteries. And it will need quite a bit of charging as this 5 hours of charging will have to run the system for 19 more hours.

So, 19hrs x 100 watts = 1900 watt hours. Rounding off to 2000 watt hours
To store 2000 watt hours of power in battery in 5 hours we will need 400 watts panel. (Please note - higher wattage panels are often of 24 volts). Now besides the 400 watts we will also need 100 watts to power the system when the sun is up and the batteries are charging.

So for the 100 watts system to be run 24×7 on solar we will need panels of 500 watts minimum. A little higher wattage is desirable as high temperatures / hot weather reduces the output of panels. So in very hot summer the panel’s output will fall a bit. Also there will be dust accumulation – which affects very little but it does and we will not clean the panels everyday.

Now the battery or batteries. I prefer using as few batteries as possible to avoid the  monitoring of the multiple cells.
As most high wattage panels are of 24 volts so I am doing the calculations for 24 volts battery

2000 watts hour / 24 volts  = 83 amps hour that is. Exact 83 AH battery might not be available so take the next higher.

For battery also little higher capacity is preferred as batteries tend to give less power in higher temperatures. Please keep in mind that you will need to increase panel power also to charge the higher battery capacity. It may sound a little complicated but it will be easy if you first determine the minimum battery size you need and then add some margin to it (say instead of 83 AH I will take a 100 AH battery) and then calculate back the panel you will need to charge that battery. Like the same system above with a 100 AH battery will need a 580 watts panel. (24v x 100 AH = 2400 watts hour. 2400 watts hour / 5 hours = 480 watts. 480 watts battery + 100 watts load = 580 watts)
Features not Available in Self hosted Gitlab Free edition

Below is the list of features NOT available in Gitlab Free Edition. For more details visit:  https://about.gitlab.com/pricing/self-managed/feature-comparison/
https://about.gitlab.com/features/

——————————–
Source Code Management
——————————–
Required Merge Request Approvals
Restrict push and merge access
Built-in and custom project templates
Multiple approvers in code review
Approval rules for code review
Repository pull mirroring
Push rules
Block secret file push
Reject unsigned commits
Verified Committer
Instance file templates
Group file templates
Code Owners

Continue reading Features not Available in Self hosted Gitlab Free edition

DIY Solar Installation – Part 1 – Required Items

I wanted to try a small solar power setup to find how much that will help me in saving my electricity bills. But after starting to setup the system I found there are many small but crucial factors. This series will document what I found and
learnt while setting up the system. This first part is about the components or parts needed for a solar power setup. For a basic solar setup, the following things are needed

  1. A solar panel – there are many types and many manufacturers. The types commonly available are Poly-crystalline and Mono-crystalline. Normally all low power panels (2 – 40 watts) are poly-crystalline. For higher wattage panels (50+ ) normally both options are available. Mono-crystalline panels performs (little) better than poly-crystalline panels. So if you really don’t mind the extra cost then you can go for mono-crystalline panels. Else poly-crystalline panels are perfectly good also. And in cloudy weather that little extra of mono panels will not matter much. One important thing is the built of the panel. The built and the frame should be strong enough to withstand bad weather for many years. All low to medium wattage panels are 12 volts. High wattage panels (300+ watts) are normally 24 volts. So while purchasing make sure you are buying what you need.
    My 12v, 60 watts Luminous panel in cloudy weather gives .71 Amps to as low as .17 Amps.
    Continue reading DIY Solar Installation – Part 1 – Required Items
Exide Battery EP Plus Series (AGM VRLA) Discharge Pattern

Exide Battery EP Plus Series (AGM VRLA) Discharge Pattern

Exide EP series batteries are sealed lead acid maintenance free battery. They use AGM (absorbed glass matt and are valve regulated). Intended to be used in Solar setup or Home UPS or inverters

As per theory of a battery, a 26 Ah battery can give 26 amps for 1 hour or 1 amp for 26 hours. But that is the ideal battery. In reality it doesn’t work that way and the time depends on discharge rate.

Here is discharge pattern for Exide EP Plus Series batteries (26Ah to 2000Ah).
Continue reading Exide Battery EP Plus Series (AGM VRLA) Discharge Pattern

Arduino and memory pointers

Arduino and memory pointers

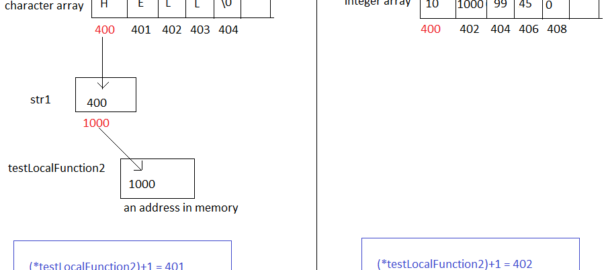
I needed to use pointers in my Arduino code. The pointer was for a string. So it was a pointer to an array or pointer to a pointer. I had last worked with pointers many decades back, so it needed a bit of remembering and experimenting to get it right. The problem was a little more compounded as it was a  pointer to an array. On the internet there are many documents but none of them actually helped. Finally I had to refer to old textbooks and college materials. Here is a brief for quick reference and recalling pointers.

In classic C strings are arrays. It can be also understood from the declaration of strings in C  – char str[] = “Hello World”;
Continue reading Arduino and memory pointers

SLA Battery minimum discharge voltage

Recently I installed a solar panel. I used a 12 volts Sealed Lead Acid Maintenance Free battery with it. There was a huge lot of confusion as to what to set the minimum voltage or cutoff voltage. The charge controller came with a preset of 10.8 volts. But on the internet many forums and sites suggested to keep the cutoff voltage to around 11.5, some said I can go as low as 9.0.

Confused I started going through manuals or leaflets of battery companies and understood that it better to refer to the manual or leaflet or company information than to rely on the random articles and forum posts on the internet.
Continue reading SLA Battery minimum discharge voltage

Websites for buying electronics parts in India

Amazon.in – exorbitant prices. Often 3 or 4 times. There are sellers who will send wrong products. Amazon will initiate a replacement which has little chance of happening if the price of item is low.

Calcuttaelectronics.com — very reliable, parts quality good. But since 2020 (after the first lockdown) their variety and stock has gone down and as of date of writing many parts are “out of stock” for many weeks. Good packaging. Support was a little disappointing.

Electroncomponents.com — has a good collection and very cheap. But the price and variety made me a bit curious (and cautious), so checked the internet and found they had a very bad reputation in the recent past. But still I ordered and got my items in time.
Parts quality mixed – some are of good quality some are cheap ones. Packaging okay. Delivery time is good.

Iotwebplanet.com — parts are good, delivery times is good, variety is good, but orders may get cancelled silently. Has COD facility. Good packaging.

Robomart.com — They are reliable. Collection is okay sort of.  Parts are often good but not always or some parts can be quite cheap quality. Packaging good.

Tanotis.com — this is in a different league from the rest including Amazon. Most parts which are not available in any other websites can be found here. Quality is very good. But the delivery time is long and sometimes order gets cancelled (but they do inform and give refund). Though costly but is still reasonable than other sites in that league. Very good packaging.
Continue reading Websites for buying electronics parts in India